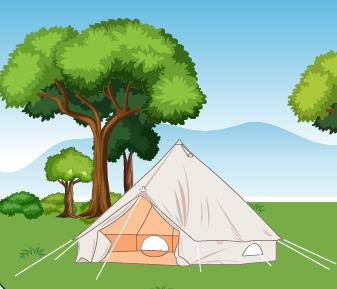
How To Set Up A Bell Tent
HOW TO SET UP AND PACK AWAY A BELL TENT

Wondering how to set up a bell tent? Assembling and taking down a luxury bell tent is easy! It only takes one person approximately 15 minutes. There is only one central pole plus the door frame. Peg and tighten the ropes and your bell tent is ready to go!
All new bell tents for sale need to be weathered/seasoned, which means they need to get wet! You can do this by hosing down the bell tent completely. You can also have a test run by pitching the tent and letting the bell tent get completely saturated by either rain or even a morning’s due. This will make sure your bell tent is weathered and completely watertight in heavy rain. There is a waterproofing agent that is applied to the canvas before it is woven, and it is this that needs to be soaked into the canvas whilst also expanding the fibres sealing the bell tent.
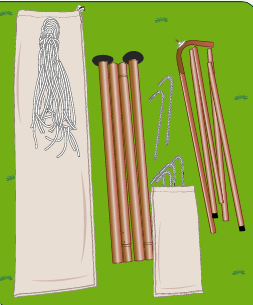
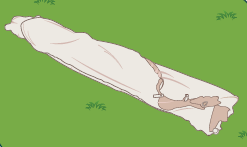
1. UNPACK AND UNROLL YOUR TENT
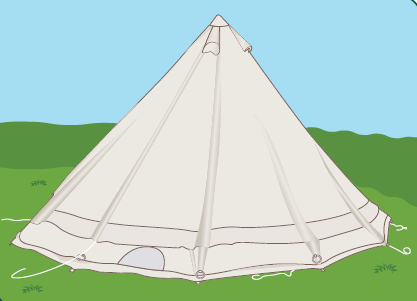
Unpack the bell tent onto a flat surface and roll it out, spreading the floor evenly. Find the door and rotate the groundsheet so it is facing the desired direction; we always recommend placing the door at the lowest point, facing downhill as to avoid drink spillage, and flooding out your sleeping area.
2. PEG THE GROUNDSHEET
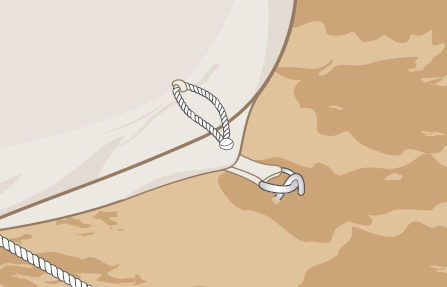
Take out the tent pegs. Pull the groundsheet tight and zip shut the door. Using a hammer or mallet, hammer in the pegs around the base of the tent. Be sure to place each peg through their loop on the tent before hammering. We highly recommend pegging out either side of the entrance first, then the opposite pegs at the back of the tent. Then work your way around the tent pegging the opposite sides and adjusting for even tension – similar to changing a car tyre.
3. INSTALL THE CENTRE POLE
Bring the ONE straight pole through the door, stepping into the centre of the tent. Be sure to place the top of the pole in the reinforced centre section of the roof of the tent. Find the centre of the cone and push the pole and tent up until it is standing straight and vertical. Be sure to place the rubber ends on both ends of the centre pole to avoid ripping the canvas.
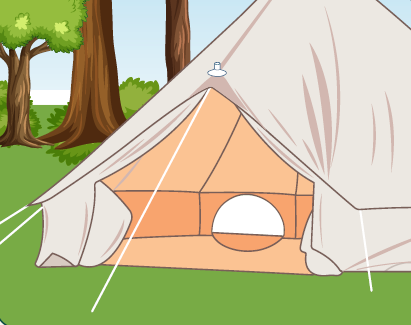
4. INSTALL THE A-FRAME IN THE DOOR
Next, slide the A-frame pole into the door frame, making sure that the spike at the tip of the A-frame is inserted into the eyelet hole in the top/centre of the door and the two legs go into the loops on the inside of the tent.
5. TIE AND PEG OUT THE GUY ROPES
Next, slide the A-frame pole into the door frame, making sure that the spike at the tip of the A-frame is inserted into the eyelet hole in the top/centre of the door and the two legs go into the loops on the inside of the tent.
Move to the outside of the tent and zip the door shut. Tie on the first longer guy rope above the front door and peg it into the ground. Please note this rope is an integral part of keeping your tent safe as the canvas may be damaged by the A-frame in strong winds if not secured properly. Tie the rest of the guy ropes around the whole tent and peg them in, one at a time.
6. ADJUST THE GUY ROPES
Once all the pegs are in, adjust the guy ropes to create the desired tension. We recommend tightening the front/centre guy ropes first. Then go around and peg and tighten each guy rope accordingly. Job done! Don’t forget to deck it out with your personal touches and you’ll be camping with style!

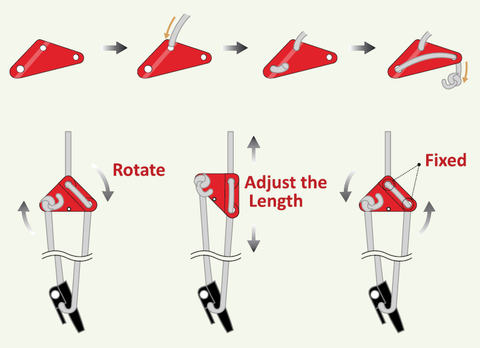
GUY ROPE & TENSIONING TIPS
All of the guy ropes need to follow the lines of the seams in the roof. Adjust the guy rope tensioners so you have approx. 50cm of loop to the peg – this allows for adjustment in both directions. It is important to make sure the bell tent stays symmetrical and that the tension is evenly spread. By doing it this way – and following the seam lines – your bell tent will look perfect and will not have any creases. If the door seems too tight to close, adjust the two guy ropes on either side of the door to relieve some tension.
WANT THE WALLS UP?
If it’s a hot day, there is nothing better than rolling the walls up and letting the breeze in. If you have a bell tent with a removable floor, you can roll up the whole tent or just a section. Simply unzip the section you want up, roll the wall up from the inside and tie using the strings provided. We usually use a slip knot (loop through loop) to save time and effort when it is time to roll them back down again.
HOW TO DISASSEMBLE YOUR BELL TENT AND GET IT BACK INTO ITS BAG
Here are some tips on packing up your bell tent after use. As stated on the Care Tips, it is VITAL that your bell tent is stored bone dry otherwise it will get attacked by mould. It is fine to take it down slightly damp, however you MUST ensure you hang it up to dry within 24 hours. You do not have to set the tent up again, just hang it on a washing line from the centre hanging loop. Basically, it just needs some air. Please also read our Cleaning and Care Tips.
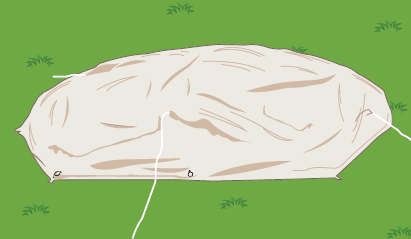
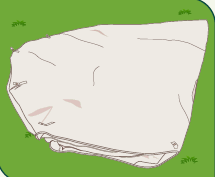
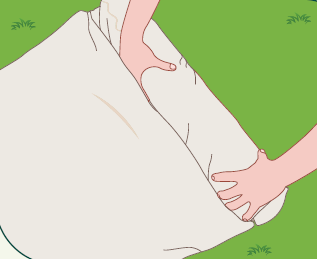
1.Take all the poles and pegs out of the tent whilst keeping the canvas off the grass - then without standing on the canvas, fold half of the tent over so you have a half moon or taco shape, canvas to canvas, with the groundsheet facing
up.
2. Let that half of the groundsheet dry out and you might want to wipe off any mud. If it’s not a dry day you’ll need to dry the tent out when you get home. The idea is that you always have canvas touching canvas and floor touching floor so even if the tent is wet you avoid stains. Once the condensation has dried off, you need to flip the half moon over so the other half of the groundsheet can also dry out. We find it is a good idea to move the tent off its original spot to avoid putting the condensation back onto the first half.
3.Once the tent is dry, fold the half moon over on itself again, so that you end up with a strip the width of the tent bag. The best way to do this is to put the bag at the top of the tent and use it as a template to get the right width.
4.Now fold the strip in half and place the pole bag and peg bag at one end. Roll the whole thing into a tight bundle using the ties to secure the tent as a roll. Next, lift one end and slip the bag over the tent.
Make sure when packing away you get all the air out of the tent on each roll and remember, to store it away completely dry !